Biting the inside of your cheek
 Biting the inside of your cheek is a common feature of facial palsy and can cause discomfort and ridges inside the affected cheek. In persistent cases, this can sometimes lead to ulceration inside your cheek. The buccinator muscle, one of the largest facial muscles, sits directly on the inside of the cheek next to the teeth. It presses the cheek against the teeth so that food does not fall into the hollow of the cheek and keeps food central in the mouth or between the teeth for chewing when we eat.
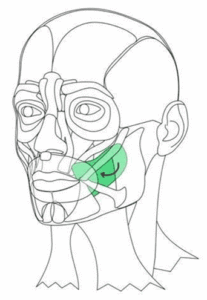
This symptom generally occurs during the later stage of recovery from your facial palsy (synkinetic stage). In the synkinetic stage, facial muscles can become shorter and tighter, and this includes the buccinator muscle. When it becomes tight or stiff, it can become clamped against the teeth which is why people often bite their cheek when they are eating. People are often not aware that the buccinator muscle exists and even less likely to know that it can get so tight and cause problems.
One way to try and relieve that tightness and reduce the amount of cheek biting is to carry out a release technique on both the inner and outer buccinator muscle.
-
- As with all releases you must first test the muscle on the unaffected side and then compare it to the muscle on the affected side.
- If they feel the same, there is no need to release it.
- If the affected side feels different in any way, such as, thicker, more tender, tighter or shorter then you need to carry out the release for that muscle.
- You will find it easier to use the left hand for the right side and the right hand for the left side.
Test for outer buccinator tightness
-
- On the unaffected side, with your palm facing outward, place two fingers into the middle of the cheek, inside the mouth…
- Make sure your teeth are gently closed and your knuckles are rested against your teeth. Bend the tips of the fingers to make a hook and push the cheek outwards away from the teeth.
- Now repeat on the affected side. Go gently as it may be very tight and tender.
- Does it feel different on the affected side? Maybe more tender. Or tighter like it doesn’t expand as far? It may even feel like it’s not as easy to get your fingers inside the mouth on the affected side due to tightness.
- If so, you should do the release. If not, then skip this release but check back on it again next week to make sure things haven’t changed.
Release for outer buccinator
-
- On the affected side, with your palm facing outward, place 2 fingers into the middle of the cheek as described above. Make sure your teeth are gently closed and your knuckles are rested against your teeth. Bend the tips of the fingers to make a hook and push the cheek outwards away from the teeth.
- Make sure you don’t cause any pain.
- Now you’re in position begin the release so hold this position for one minute imagining the muscle slowly expanding around your fingers as it releases
Test for inner buccinator tightness
-
- On the unaffected side place two fingers inside the cheek but right by the corner of the mouth.
- You may feel a ridge there and if so make sure you’re on the ridge.
- Make sure your teeth are gently closed and your fingers are rested against your teeth. Bend the tips of the fingers to make a hook and push the corner of the mouth outwards away from the teeth. You want to be as close to the corner of the mouth as you can be without your fingers popping out of your mouth.
- Now repeat on the affected side. Go gently as it may be very tight and tender.
- Does it feel different on the affected side? Maybe more tender. Or tighter like it doesn’t expand as far? If so, you should do the release.
- If not, then skip this release but check back on it again next week to make sure things haven’t changed.
Release for inner buccinator
-
- On the affected side place 2 fingers inside the cheek but right by the corner of the mouth. You may feel a ridge there and if so, make sure you’re on the ridge.
- Make sure your teeth are gently closed and your fingers are rested against your teeth.
- Bend the tips of the fingers to make a hook and push the corner of the mouth outwards away from the teeth. You want to be as close to the corner of the mouth as you can be without your fingers popping out of your mouth.
- Make sure you don’t cause any pain.
- Now you’re in position begin the release by holding for one minute imagining the muscle slowly expanding around your fingers as it releases.
- Do this at frequent intervals throughout the day. It may be especially helpful if you do this before meals/eating and before brushing your teeth.
For the above techniques, make sure your fingernails are short so they don’t cut into the inside of the cheek.
Read more
Photo by DDP on Unsplash